Urdu Installation in Windows 7
Here is how to install Urdu in Windows 7 without “Pak Urdu Installer” so that if someone wants to install Urdu without installer or if there is a problem in downloading “Pak Urdu Installer” due to low internet speed. He could easily install Urdu. As mentioned earlier, in order to install Urdu in Windows 7 and to view Urdu in a better way, two small things have to be done.
Setting Urdu keyboard layout and language bar
Installing Urdu fonts
Now the description of these two tasks, that is, how to do it.
Setting Urdu keyboard layout and language bar
First of all, install any Urdu keyboard layout that you like on your computer.
You can download an Urdu keyboard layout from here.
Normally with the installation of Urdu keyboard layout, Urdu support is fully integrated in Windows Vista and the language bar on the taskbar starts appearing as seen in the picture below.
Now your computer is able to write Urdu. If you press Alt + Shift on the left side of the software in which Urdu is to be written, then your computer will be in Urdu mode in that software, ie whenever you press any key, Urdu will be written. Similarly, to change the mode of a software to English, press Alt + Shift on the left side again, which will return to English mode. If you want to see what mode your computer is in in that software, look at the language bar on the taskbar.
If it is in Urdu mode, the language bar will be like this.
If it is in English mode, the language bar will be like this.
Finishing one keyboard layout and adding another
Here's how to remove your installed keyboard layout and choose a new keyboard layout or use multiple keyboard layouts. Where are the keyboard layout and language settings?
1: - Open Control Panel on your computer for which click Start then click Control Panel.
2: - Click on Change keyboards or other input methods.
3: - Now click on Change Keyboards.
4: - Click Add in the new window that appears.
5: - Now in the new window that appears you have to choose your language and its keyboard layout.
In this window, there is a list of languages. When you go down, Urdu (Islamic Republic of Pakistan) will be written in one place. Open it and then open the Keyboard in its sub-list. The layout, along with Windows Vista's self-contained keyboard layout, will appear. Select the keyboard layout you want. Here you can also select multiple keyboard layouts.
One thing to keep in mind here is that if you select Urdu instead of your installed Urdu keyboard layout in the Keyboard sub-list, which is Windows Vista's self-made Urdu keyboard layout, then when you use the "a" key When pressed, "m" will be written. Similarly, "b" will be written as "sh" which is not commonly used by Urdu writers but they prefer to write "a" to "a" and "b" to "b" Do That is, Urdu letters according to the sound of English letters. Therefore, it is best to select only your installed keyboard layout in the Keyboard sub-list. As shown in the picture below.
7: - Now OK then OK and then OK then close the control panel.
The changes you have made are now saved. To change the language, press Alt + Shift on the left, or you can change the language from the language bar.
Setting the language bar
If for some reason the language bar does not appear on the taskbar or any other changes need to be made to the language bar
Start -> Control Panel -> Change keyboards or other input methods -> Change Keyboards
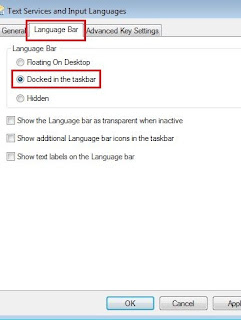
Go to and then click on the Language Bar tab and a window like the one below will appear.
Select the Docked in the taskbar radio button here and then click OK. This will make the language bar appear on the taskbar. Similarly, if you want to remove the language bar from the taskbar, select the Hidden radio button and click OK. This will make the language bar disappear.
Installing Urdu fonts
Download custom Urdu fonts. You can also download some essential Urdu fonts from here.
Downloaded fonts are usually compressed / zipped. Copy the fonts by unzipping them before installing. Now go to Control Panel and paste your custom fonts in the Fonts folder there. This will install all pasted fonts. Whether the font is Urdu or any other language, the font is installed using Windows.
In addition, the font installer available here can be used which automatically installs the necessary Urdu fonts.


Good information
ReplyDelete